Intermediate Tutorial: Meshing and Collisions
In this tutorial we will enable meshing and demonstrate how to collide objects with the generated mesh. You’ll use ARDK managers in the scene to do the meshing, and then query them for mesh information.
Additional details and examples for meshing are available in the docs:
If you need code-level details of how meshing works, the majority of the work is in _MeshDataParser.cs.
Note
The mocking system demonstrated in the video has been updated in ARDK 1.3. For details on mock mode changes see the additional Mock Mode video.
Preparation
This tutorial assumes you have a working Unity scene with the ARDK imported. Please refer to the Getting Started With ARDK page for more details on how to import the ARDK package.
Steps
Create a new scene.
In the Scenes section of the Project view, create a folder (right-click Create > Folder) and call it
Meshing.In that folder create a new scene (right-click Create > Scene) and call it
MeshingTutorial.Don’t forget to add the scene in the project Build Settings so it will be added when we start the app.

Add the ARDK Managers.
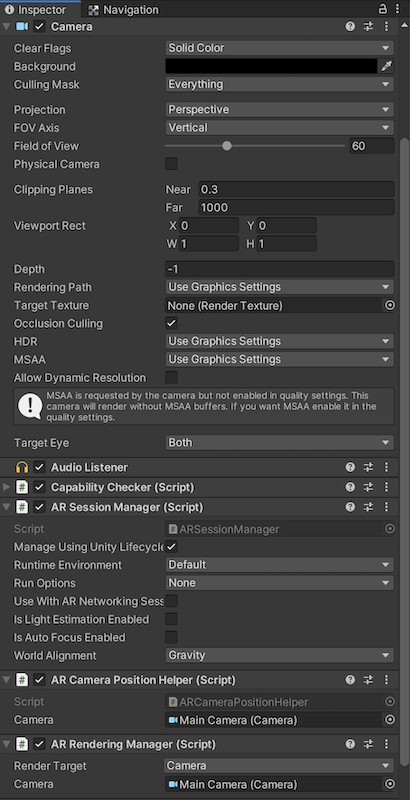
Add the following ARDK manager components to your camera object:
AR Session Manager
AR Camera Position Helper
AR Rendering Manager
AR Depth Manager
Make sure that the Camera field on the managers is set to the scene camera.
Add the ARMesh prefab to your scene.
In the project view, navigate to
ARDK/Extensions/Meshing/ARMesh.prefaband drag the prefab into your scene. This prefab is set up to manage everything to do with meshing and has a callback to get and modify mesh information.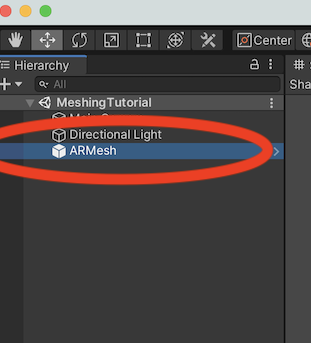
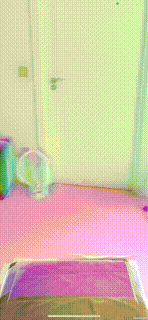
Build and run on your device.
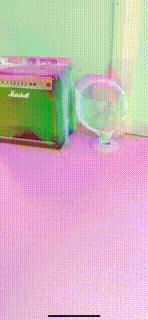
You should see a generated mesh overlaid on your scene.
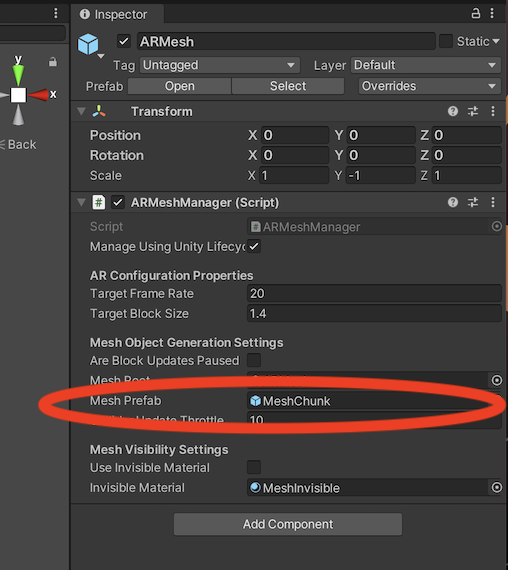
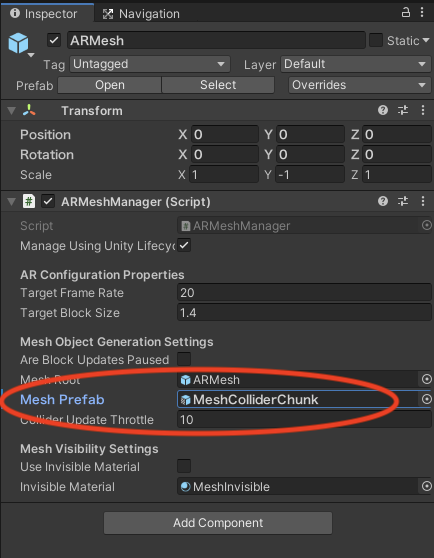
Examine the ARMesh configuration.
The ARMesh Prefab has several settings, in particular the Object Generation settings that control what is used when a new mesh is returned.
By default the Mesh Prefab variable points to the
MeshChunkprefab. This just applies a normals shader to whatever is returned so that you get a color based on the facing direction of any surface in the mesh.You can replace that with something else like an object spawner. For example, in the garden example we use this to generate plants at vertex locations.
Use a collision mesh.
Swap out the
MeshChunkwithMeshColliderChunk.MeshColliderChunkadds a collision mesh so that you can interact with Unity physics objects.
We will use this collision mesh to drop a ball into our scene and have it hit the mesh:
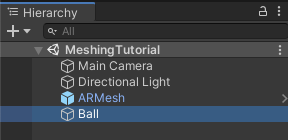
Add a Sphere to be the ball.
Right-click on the scene hierarchy and click Game Object > 3D Object > Sphere.
Click on the sphere and set its size to 0.1 and its location to 1 meter away and 1 meter up.
Then add a rigid body component to the sphere. This tells Unity to give the sphere physics properties so it will fall down unless it hits something. You can also apply forces to it to move it around, simulate throwing it etc.

Add a plane into the scene to test things in Unity before moving onto the device.
Add a plane to the scene. Name the plane
MockPlane. Add theMockSceneConfigurationcomponent to the plane so ARDK Mock Mode will include the plane in AR processing when your project is run in the Unity editor.Turn the scene object into a prefab by dragging the
MockPlaneobject into your Project hierarchy (to a prefabs folder if you have one).Delete the original
MockPlanefrom your scene, to ensure the plane doesn’t show up when you run the scene on your mobile device later.In the Lightship > ARDK > Virtual Studio window, go to the Mock tab and select MockPlane in the Mock Scene dropdown. If you don’t see MockPlane, click the refresh icon next to the dropdown and look for MockPlane again.
Add code to control when the ball falls.
If we build and run our scene on the phone now, it will work, but the ball will likely fall through the ground as the AR mesh won’t have been generated yet. We could either add an event to trigger when the mesh is fully generated, or just let the user tap the screen to throw the ball. For simplicity for this tutorial let’s just enable the ball when the user clicks on the screen.
First, we need to create a script called
MeshingTutorialto add our logic to. You can add this to your camera or to an empty game object added to your scene. We need to pass the ball game object into our script. We then disable the ball in theStartfunction and add an on-touch input to re-enable it.using System.Collections; using System.Collections.Generic; using UnityEngine; using Niantic.ARDK.AR; using Niantic.ARDK.AR.ARSessionEventArgs; using Niantic.ARDK.AR.Configuration; using Niantic.ARDK.AR.Mesh; using Unity.Collections; using Niantic.ARDK.Utilities; using Niantic.ARDK.Utilities.Input.Legacy; public class MeshingTutorial : MonoBehaviour { //pass in our ball public GameObject _ball; // Start is called before the first frame update void Start() { _ball.SetActive(false); } // Update is called once per frame void Update() { if (PlatformAgnosticInput.touchCount <= 0) { return; } //if the user touches the screen enable the ball var touch = PlatformAgnosticInput.GetTouch(0); if (touch.phase == TouchPhase.Began) { _ball.SetActive(true); Debug.Log("Touch"); } } }
Run on your device.
You should now have a ball that appears when you tap, that will hit the ground and roll around.
Update the function to throw the ball every time you tap.
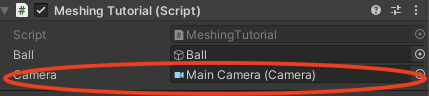
using System.Collections;
using System.Collections.Generic;
using UnityEngine;

using Niantic.ARDK.AR;
using Niantic.ARDK.AR.ARSessionEventArgs;
using Niantic.ARDK.AR.Configuration;
using Niantic.ARDK.AR.Mesh;

using Unity.Collections;

using Niantic.ARDK.Utilities;
using Niantic.ARDK.Utilities.Input.Legacy;

public class MeshingTutorial : MonoBehaviour
{
    public GameObject _ball;
    public Camera _camera;
    // Start is called before the first frame update
    void Start()
    {
        _ball.SetActive(false);
    }

    // Update is called once per frame
    void Update()
    {
        if (PlatformAgnosticInput.touchCount <= 0) { return; }

        //if the user touches the screen enable the _ball
        var touch = PlatformAgnosticInput.GetTouch(0);
        if (touch.phase == TouchPhase.Began)
        {
            _ball.SetActive(true);

            //get the rigidbody from teh _ball and reset it.
            Rigidbody rb = _ball.GetComponent<Rigidbody>();
            rb.velocity = new Vector3(0f, 0f, 0f);
            rb.angularVelocity = new Vector3(0f, 0f, 0f);

            //move the _ball to the a point infront of the camera.
            _ball.transform.rotation = Quaternion.Euler(new Vector3(0.0f, 0.0f, 0.0f));
            _ball.transform.position = _camera.transform.position + _camera.transform.forward;

            //then add a force to the rigid body to launch it from teh camera.
            float force = 100.0f;
            rb.AddForce(_camera.transform.forward * force);

        }
    }
}
Remember to connect the camera to your updated script as we need its position and forward vector.
Run in Unity and on your device.
You should now be able to tap to throw a ball into the scene rather than just dropping it.

Other things to try:
Increase the force to make the ball move more.
Rather than having just the one ball you could turn it into a prefab and create a new one every time the user clicks to have lots of them bouncing around.
You could add effects when the ball hits a mesh.
You can also turn off the debug coloring of the mesh by enabling Use Invisible Material on the ARMesh object.
Experiment with mocks in Unity
ARDK has a mock mesh ability which lets you to bring a scanned mesh into the editor so that you can test with a more realistic environment rather than mock planes.
To record a mesh you will need to build ARDK-examples and run the meshing example. When you run the example there is a Save Mesh button. This will snapshot the mesh that you are currently seeing so you can then copy it off the phone and use it in the Unity editor with a MockMesh component.
For more detail, see: Intermediate Tutorial: Meshes in the Unity Editor