Playing in Mock Mode
Using Mock mode to test without a mobile device.
Overview
In Mock mode, all AR and networking functionality is mocked inside the Unity Editor, eliminating the need for building to a mobile device at all (although you should still build to device or use the Remote mode periodically, to make sure your app works as expected with real AR data).
The following video demonstrates how to use Virtual Studio and Mock mode in Unity:
Note
The mocking system demonstrated in the video has been updated in ARDK 1.3. For details on mock mode changes see the additional Mock Mode video.
Mock AR Environments
A mock ARSession is constructed and used with the exact same code as a live device or remote ARSession; i.e., there is no new or different code that has to be written to utilize these features.
Using Mock Environments
From the Unity menu, open the Lightship > ARDK > Virtual Studio window and select the Mock option.
Select a Mock environment from the dropdown. There are ready-made environment prefabs available for download through the Lightship portal, but you can also create your own mock environments (see “Creating Mock Environments” section below).
Enter Play Mode, and the environment will automatically be spawned into your scene. A layer called
ARDK_MockWorld, which is required to correctly render the mock environment, will be added to your project if it does not already exist.
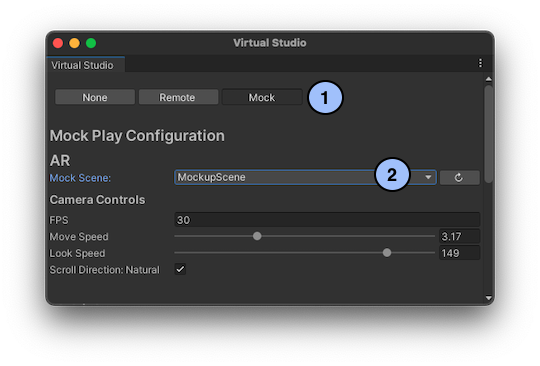
Camera Controls
Movement and look speed can be configured in the Unity toolbar’s Lightship > ARDK > Virtual Studio window.
Creating Mock Environments
Create a new prefab and add a
MockSceneConfigurationcomponent to the root GameObject.Add 3D models to the prefab to create an environment.
Follow the steps below to add AR information to your environment.
Press the Refresh button next to the Mock Scene dropdown in the Virtual Studio window to be able to select your new prefab for use.
Mock Plane Detection
Add a
MockPlaneAnchorcomponent to a GameObject in your prefab.Use the component’s Center and Rotation properties to position the anchor (visible in the Gizmo) on top of the surface you’re marking as a plane.
Set the Time to Discovery value to be the number of seconds it should take for the anchor to be detected, counting from after
IARSession.Runis called.Repeat steps 1 and 2 for all planes in your scene.
See for example: LivingRoom prefab’s Walls > Wall_Back or Furniture > PlaneAnchor objects.
Mock Image Detection
Create an empty GameObject in your prefab.
Add a
MockImageAnchorcomponent to that GameObject.Import your image into your Unity project by dragging it into the Project view window.
Set the component’s
Imageproperty to your imported image. 1. If the image appears distorted, go to the Advanced section of the Texture Import Settings <https://docs.unity3d.com/Manual/class-TextureImporter.html#advanced> and change the Non-Power of 2 value toNone. Click Apply to re-import the image with the new settings. Then right click on theMockImageAnchorcomponent in your prefab and select the Update Display option. 2. If the image still appears distorted, right click on theMockImageAnchorcomponent and select the Reset option, then set theImageproperty again.Set the
Time to Discoveryvalue to be the number of seconds it should take for the anchor to be detected, counting from afterIARSession.Runis called.Set the
Namevalue to the exact same name used to create theARReferenceImagein your application’s code.
See for example: LivingRoom prefab’s Wall > Wall_Back CrowdImage object.
Mock Semantic Segmentation
Add a
MockSemanticLabelcomponent to any GameObject that has aMeshRenderercomponent.Set the component’s Channel value to be the semantic channel its GameObject’s mesh should be interpreted as.
Repeat steps 1 and 2 for all meshes in your scene you want to add semantics for.
See for example: ParkPond prefab’s Sky or Trees > Tree > Branches objects.
Other AR Features
Depth: Any mock environment will automatically surface depth buffers, if a depth-enabled AR session is being run.
Meshing: A stand-in mesh to your scene by using
MockMeshorMockMeshSequenceto load a pre-created mesh file. You can generate a mesh file using your mobile device and the MeshSaver scene in ARDK-Examples. For more details see Intermediate Tutorial: Meshes in the Unity Editor. * In-editor meshes for mock environments (i.e. AR meshes aligning to Unity Mesh objects) are currently unsupported.
Mock Multiplayer
As with mock AR, no additional code is needed to use the mocked network. However, there are some additional APIs that unlock ways of simulating the local player interacting with (multiple) mock players. Mock players and their ARSession, MultipeerNetworking, and ARNetworking instances can be created and controlled either through scripts or the Virtual Studio editor window.
Configuring the Mock Players
To create mock players, first create a MockPlayConfiguration, which is a ScriptableObject defines the properties of each mock player.
In the Unity Editor’s Project window, right click to open the context menu. Then select Create> ARDK> MockPlayConfiguration.
Set the size of the
Profilearray to be the max number of mock players you want in your play through.Define the player’s properties:
Name:Is Active: true if player should be initialized. Inactive players will have no effect on the application.Using Network: true if the player should initialize anIMultipeerNetworkinginstance.Using AR: true if the player should initialize anIARSessioninstance.Using AR Networking: true if the player should initialize anIARNetworkinginstance.If this property is true, then both
Using NetworkandUsing ARmust also be true.
Optionally, add a prefab that will be spawned in the scene when a mock player initializes, which can be used to control that player’s AR pose.
Initializing the Mock Players
For entirely script-free control of the mock multiplayer experience, open the Unity toolbar’s Lightship > ARDK > Virtual Studio window.
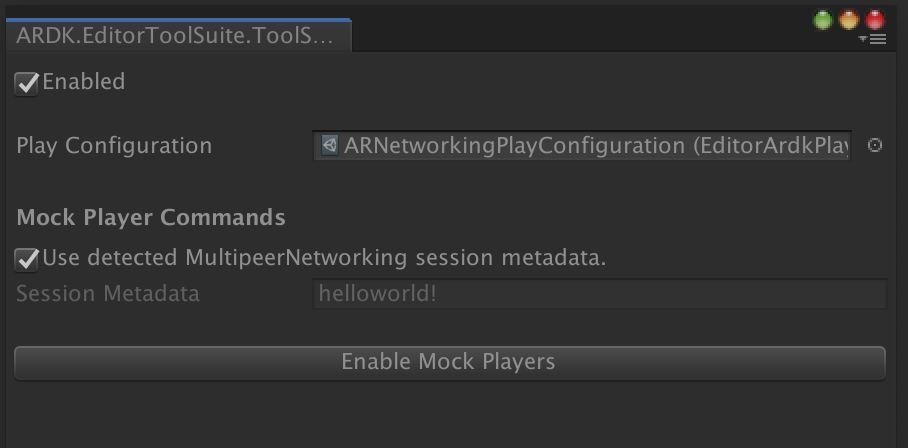
Check the box to enable the window (disabling guarantees no code from the window that could potentially affect gameplay will get run).
Also make sure that the Use Remote box in the ARDK> Remote Connector window is disabled
Select a
MockPlayConfigurationasset to use.Check the Use detected MultipeerNetworking session metadata box to have mock players should connect to their networking session with whatever session metadata was used by the local player.
For this functionality to work, the local player’s networking must be connected before mock players are enabled.
Else, type in the networking session metadata that should be used by the mock players. That same session metadata should then be used by the local player to connect.
Click the Connect and Run All button to create, run all the
ARSessions, and connect all theMultipeerNetworkingsessions owned by the mock players, as defined in the selectedMockPlayConfiguration.This button is only enabled when the Unity Editor is in Play Mode.
Scripting Mock Players
Scripting allows for finer control over mock players, in order to simulate and test more complex multiplayer scenarios.
To get all active MockPlayer instances:
using Niantic.ARDK.VirtualStudio;

private MockPlayConfiguration _playConfiguration;

public void AccessAllPlayers()
{
  foreach (var profile in _playConfiguration.ActiveProfiles)
  {
    var player = profile.GetPlayer();
    // do something with player
  }
}
From here, the MockPlayer API can be used to access the mock player’s ARDK objects and control them, just as you control the local player’s.
For example, the code snippet below could be used to test how an application reacts to multiple new players joining a networking session.
using System.Collections;

  private IEnumerator ConnectWithDelay(MockPlayConfiguration playConfiguration, byte[] sessionMetadata)
  {
    foreach (var profile in playConfiguration.ActiveProfiles)
    {
      if (profile.UsingNetwork)
      {
        yield return new WaitForSeconds(2f);

        var player = profile.GetPlayer();

        Debug.LogFormat("{0} is connecting.", player);
        player.Networking.Join(sessionMetadata);
      }
    }
  }
More examples of using these APIs can be found in the ARDK-Examples project under Assets/ARDKExamples/VirtualStudio, in the ExampleMockPlaythrough scene, which uses the ExamplePlayController.cs script.
Mock Localization
In an on-device ARNetworking session, players in a shared session localize by scanning the environment to find AR maps. Localization in a mock session can be triggered in several different ways:
Mock map detection
Attach a MockMap component to a
GameObject. The map’s position will match theGameObject‘s.Set the
TimeToDiscoveryvalue to be the number of seconds it should take for the map to be found, counting from afterIARSession.Runis called.The map will only be detected by the local player. To change the peer states of other mock players, use one the other options described below.
Scripted peer state changes
The MockPlayer.SetPeerState(state) method can be used to change the PeerState of any player connected to an ARNetworking session.
Virtual Studio Editor Window > Mock
Once a player is connected to an ARNetworking session, a dropdown box will appear that can be used change their peer state.