Getting Started with the Scanning Framework
Use this guide to learn how to introduce scanning into your app. Review the Basic Flow to understand how users use apps to scan, then follow the Steps to implement scanning your app.
Note
This is a Public Beta feature and functionality may change in a future release. For more information on ARDK feature launch types like Public Beta, see Lightship Launch Types.
When you scan a location, you create a collection of images that are processed into a textured 3D mesh. For example:
This allows you to scan an object in the real world and bring the textured mesh into your app as a movable object. Or you can scan a location to activate it as a VPS Wayspot, to use the VPS location in your game.
Basic Flow
The basic user flow for scanning with the Scanning Framework is:
The user presses Scan to create a scan using their device, scanning the desired object with their device camera, and pressing Stop. This triggers calls to ARScanManager.StartScanning() and StopScanning() and optionally displays scan visualizer output while the user is scanning with their device.
The user then presses Process to process the scan. This action triggers a call to ARScanManager.StartProcessing(). As the scan is processed by the Scanning Framework, your app can use ARScanManager.GetScanProgress() to check the progress and update a progress bar.
Once the Scanning Framework has finished processing the scan, the user can retrieve the resulting textured mesh. The user can also press Save to save the scan, which triggers a call from your app to ARScanManager.SaveCurrentScan() and saves the scan locally.
Prerequisites
You must have an ARDK API key to use the Scanning Framework. If you don’t have one, navigate to your Lightship Account Dashboard and under Projects, click New Project to create a new project and Create New Key to create a new API key for that project.
Steps
1. Setup a new ARDK Unity Project
Create a new “3D Mobile” Unity project.
Import the ARDK package into your Unity project. Use the steps described in Steps.
Create an
Assets/Resources/ARDK/ArdkAuthConfigasset in your Unity project and set the API Key value to the ARDK API Key you created earlier. See “Creating the ARDKAuthConfig” in Authentication for more detailed steps.Set your Unity project build settings for iOS or Android using the steps described in Building ARDK Apps for iOS or Building ARDK Apps for Android.
Add necessary ARDK managers and components to your scene:
ARSceneManager prefab:
The ARSceneManager prefab adds an ARDK-compatible
ARSceneCamerato the scene, so you should remove any default camera created by Unity when you created your scene.If you’re building for Android, add the Android Permissions Requester helper component to your
ARSceneManager. Set Size to 1, and make sure Camera is in the drop down. This ensures the app asks the user for permission to use the camera at run-time. See Permissions for more details on enabling Android permissions.
AR Camera Position Helper and AR Rendering Manager, which should get automatically added to your
ARSceneCameraas part of adding ARSceneManager.
2. Add Scanning Framework, Scanning UI, and Scanning Logic to Your Scene
Add an empty
GameObjectto your scene. Add a new script component,ScanningExampleManager, to yourGameObjectthat will provide UI handlers for scanning. Add anARScanManagerserializable field to yourScanningExampleManager:using Niantic.ARDK.AR; using Niantic.ARDK.AR.Scanning; using Niantic.ARDK.Extensions; using Niantic.ARDK.Extensions.Scanning; public class ScanningExampleManager : MonoBehaviour { [SerializeField] [Tooltip("The scene's ARScanManager")] private ARScanManager _scanManager; // ... }
ARScanManager provides a convenient manager interface into the Scanning Framework. Add an
ARScanManagercomponent to yourScanningExampleManagerand set theScanningExampleManagerScan Manager field to thisARScanManagerinstance.Add UI to your scene to handle scanning and UI event handlers in your
ScanningExampleManager.Create a Unity Canvas in your scene and add the following buttons to it: Scan, Stop.
For starting a scan, add a
ScanButtonPressed()method in yourScanningExampleManagerand connect it to your Scan button’sOnClick(). InScanButtonPressed()call ARScanManager.StartScan()` to begin the scan.public void ScanButtonPressed() { _scanManager.StartScanning(); }
The Scanning Framework provides options to control what visualization information is provided during the scan, exposed in ARScanManager via the
enableRaycastVisualization, andenableVoxelVisualizationfields.The user should point the device camera at the object to be scanned, and move around the object. See Scanning Best Practices for basic guidance on how to scan.
The scan process can optionally display visualizations that help the user understand what is being scanned. You`ll add visualizers in the “Add Scan Visualization” step later.
To let the user finish the scan, add a
StopButtonPressed()method to yourScanningExampleManagerand connect it to your Stop button’sOnClick(). InStopButtonPressed()call ARScanManager.StopScanning to stop the scan.public void StopButtonPressed() { _scanManager.StopScanning(); }
Add UI to your scene to handle scan processing and UI event handlers in your
ScanningExampleManager.Once the user has finished scanning, the Scanning Framework needs to process and optimize the mesh. You can start processing the scan using ARScanManager.StartProcessing() as soon as ARScanManager.ScannerState is IScanner.State.ScanCompleted, but for this example we’ll use a button to let the user manually start processing the scan.
In your Unity Canvas add the following buttons to it: Process, Cancel.
Also add a Slider named Progress to your Canvas.
To let the user start processing a finished scan, add a
ProcessButtonPressed()method in yourScanningExampleManagerand connect it to your Process button’sOnClick(). InProcessButtonPressed(), check that theScannerStateisScanCompletedand then callARScanManager.StartProcessing()to begin processing the scan.public void ProcessButtonPressed() { IScanner.State state = _scanManager.ScannerState; if (state == IScanner.State.ScanCompleted) { // Start processing scan _scanManager.StartProcessing(); } }
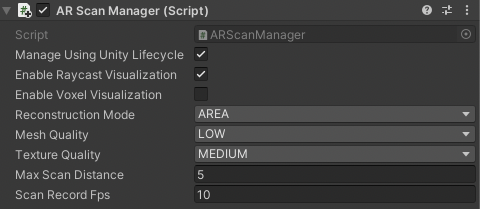
The Scanning Framework provides options to control how the scan is processed, exposed in ARScanManager via the
reconstructionMode,meshQuality, andtextureQualityfields.This image shows the Unity UI with the ARScanManager Settings:
To show how far along the scan process is, connect your Progress Slider to your
ScannerExampleManagerand update the slider value using ARScanManager.GetScanProgress().[SerializableField] private Slider _progressBar; private void Update() { IScanner.State state = _scanManager.ScannerState; if (state == IScanner.State.Processing) { _progressBar.gameObject.SetActive(true); _progressBar.value = _scanManager.GetScanProgress(); } else { _progressBar.gameObject.SetActive(false); } }
To let the user cancel the scan processing, add a
CancelButtonPressed()method in yourScanningExampleManagerand connect it to your Cancel button’sOnClick(). InCancelButtonPressed(), call ARScanManager.CancelProcessing() to cancel the in-progress scan processing.public void CancelProcessButtonPressed() { _scanManager.CancelProcessing(); }
3. Add Scan Visualization
For this walkthrough you’ll just use a Point Cloud visualizer. See the Scanning example scene in ARDK-Examples to see how the user can toggle between different visualizers.
In your
ScanningExampleManagerscript, add a field for the visualizer.[SerializeField] private PointCloudVisualizer _pointCloudVisualizer;
Add a
PointCloudVisualizercomponent to your Unity scene. Set the Material to an appropriate material that draws points in the scene. You can use the shaders inARDK/Extensions/Resources/ARDK/as an example. If you want to add animation to the visualizer, adjust the Animation Curve and Update Interval. Set theScanningExampleManagerPoint Cloud Visualizer field to your visualizer instance in Unity.Note
See the SimplePointCloud and PulsePointCloud prefabs in the Scanning ARDK-Examples scene for more example configurations of PointCloudVisualizer.
In your
ScanningExampleManager.Start()method, set the PointCloudVisualizer as the default visualizer.void Start() { // Set default visualizer _scanManager.SetVisualizer(_pointCloudVisualizer); }
Now when the user starts a scan, the PointCloudVisualizer will be used to visualize what’s being scanned. See Visualizing Scans for more details on Scanning Framework visualizers.
4. Handle Processed Scan Mesh Results
Add an event handler for receiving the processed scan mesh.
In your
ScanningExampleManageradd a ARScanManager.ScanProcessed event handler to receive the processed mesh.Create a prefab to display the result mesh and assign it to the component. The prefab should have a
MeshFilterandMeshRenderercomponent. Create aGameObjectin the scene to be the parent of this prefab. You can consult theAssets/ARDKExamples/Scanning/ScannedObjectPrefab.prefabin the ARDK Examples package for an example.Add the parent object to the script as
_scannedObjectParent. When you instantiate thescannedObject, Unity needs this parent.The following example sets the ARScanManager.ScanProcessed handler to
ScanResultHandler. InScanResultHandleran instance of_scannedObjectPrefaband_scannedObjectParentis required to initiate the scanned object.private GameObject scannedObject; [SerializeField] private GameObject _scannedObjectPrefab; [SerializeField] private GameObject _scannedObjectParent; private void Start() { // ...other init code as needed... _scanManager.ScanProcessed += ScanResultHandler; } private void ScanResultHandler(IScanner.ScanProcessedArgs args) { if (texturedMesh != null) { if (scannedObject == null) { scannedObject = Instantiate(_scannedObjectPrefab, _scannedObjectParent); } Bounds meshBoundary = texturedMesh.mesh.bounds; scannedObject.transform.localPosition = -1 * meshBoundary.center; scannedObject.transform.localScale = Vector3.one / meshBoundary.extents.magnitude; scannedObject.GetComponent<MeshFilter>().sharedMesh = texturedMesh.mesh; if (texturedMesh.texture != null) scannedObject.GetComponent<Renderer>().material.mainTexture = texturedMesh.texture; } }
Add UI to let the user save the processed scan mesh to the local device.
In your Unity Canvas add a Save button.
To let the user save the processed scan, add a
SaveButtonPressed()method in yourScanningExampleManagerand connect it to your Save button’sOnClick(). InSaveButtonPressed(), call ARScanManager.SaveCurrentScan() to save the scan on the local device.public void SaveButtonPressed() { _scanManager.SaveCurrentScan(); }
You can optionally also restart the Scan Manager using ARScanManager.Restart() to let your user start another scan.
ARScanManager also provides methods to manage locally saved scans, such as getting a list of saved scans via ARScanManager.GetSavedScans(), or deleted a saved scan via ARScanManager.DeleteScan().
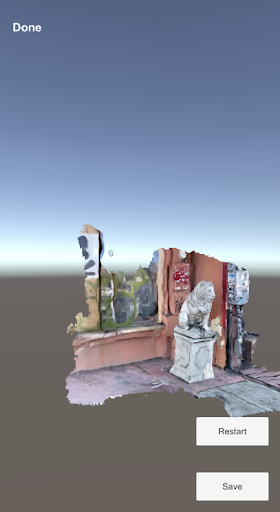
This image shows an example of a mesh of a processed scan, displayed on device.
Next Steps
Next, see Scanning for VPS for more information on executing VPS scans, and Scanning Settings for more information on visualizing and processing scans.