Beginner Tutorial: Depth Textures
ARDK can generate a depth buffer from camera footage.
The depth buffer contains the distance to objects from the camera. This is represented as a grayscale texture that you can use to determine if something is in front or behind something else. Or, you can use the depth buffer to create postFX like distance based blurring, pulsing waves through the scene, and more.
This tutorial will walk through how to get the depth buffer into a texture from ARDK and then overlay that on the screen using a full screen shader.
Note
The mocking system demonstrated in the video has been updated in ARDK 1.3. For details on mock mode changes see the additional Mock Mode video.
Preparation
This tutorial assumes you have a working Unity scene with the ARDK imported. Please refer to the Getting Started With ARDK page for more details on how to import the ARDK package.
Steps
Create a new scene.
Create a new folder in your
Assettree calledDepthTextures.Create a new scene in that folder. Right-click in the folder and select Create > Scene. Name it
DepthTexturesTutorial.
Add the managers and set up the camera.
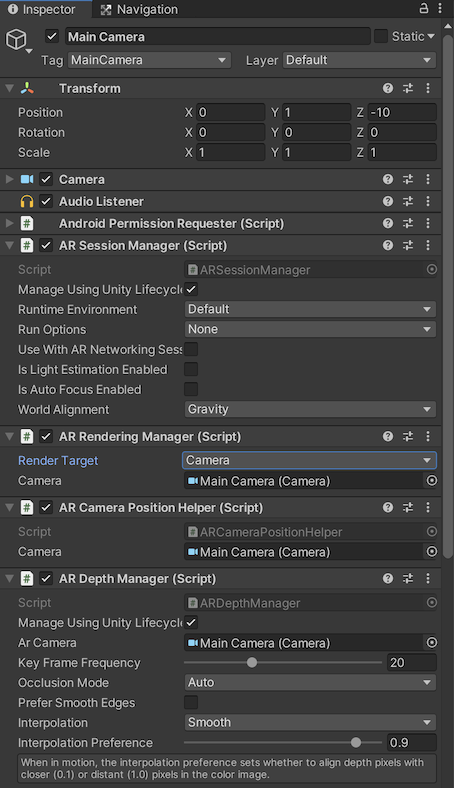
Add in the ARDK managers we will need. For this tutorial we will be adding these to the camera object for simplicity, but they can be added to other objects in the scene, like empty game objects. Add the following components:
AR Session Manager
AR Depth Manager
AR CameraPositionHelper
AR Rendering Manager
In the manager/helpers make sure the Camera variables are all set to the Main Camera.
Change the camera’s background to a solid color and make it black.
Create your script.
Create a new Script (right-click Create Script in the project view) and call it
DepthTutorial.Add the script to the Main Camera (this will save us a step later on).
Add in public variables to pass in all of the managers, and set up a callback to catch the depth buffer update event.
using System.Collections;
using System.Collections.Generic;

using UnityEngine;
using UnityEngine.UI;

using Niantic.ARDK.AR.ARSessionEventArgs;
using Niantic.ARDK.AR;
using Niantic.ARDK.AR.Awareness;
using Niantic.ARDK.AR.Awareness.Depth;
using Niantic.ARDK.AR.Configuration;

using Niantic.ARDK.Extensions;

public class DepthTutorial : MonoBehaviour
{

    [Header("ARDK Managers")]
    //All of the ardk managers we need for this Tutorial
    //depth manager to get the depth buffer
    public ARDepthManager _depthManager;

    // Start is called before the first frame update
    void Start()
    {
        //hook the depth and semantic managers update functions
        //in order to capture the buffers we need for our shader
        _depthManager.DepthBufferUpdated += OnDepthBufferUpdated;

    }

   //Depth callback
    private void OnDepthBufferUpdated(ContextAwarenessArgs<IDepthBuffer> args)
    {

    }

    // Update is called once per frame
    void Update()
    {

    }
}
Build and run in the Unity editor.
Fix any build errors you might have due to missing a namespace or typos.
At this point, when you run the scene, you should see a blank screen with a skydome in Unity.

Setup a mock object so you can test in Unity.
Geometry objects added to a prefab with a
MockSceneConfigurationcomponent are treated as though they came from a device camera feed and will be hidden when running on a device. This means we can quickly iterate in the editor.To add a mock:
Create a mock configuration prefab by creating an empty GameObject named MockupDepthScene. Add the
MockSceneConfigurationcomponent on the GameObject.Add a cube to your scene:
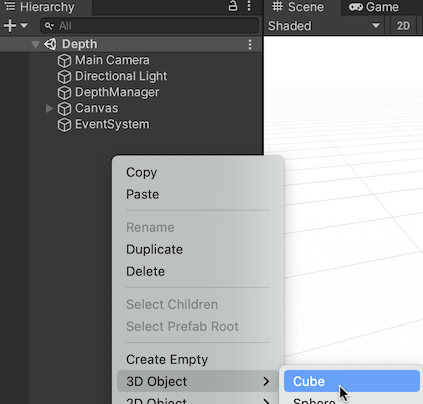
Select the cube.
Make the cube a child of your MockupDepthScene object.
Move the cube to +1 in Z and scale it to 0.5,0.5,0.5 to make it visible on screen
Turn the scene object into a prefab by dragging the MockupDepthScene object into your Project hierarchy (to a prefabs folder if you have one). Delete the original MockupDepthScene from your scene.
In the Lightship > ARDK > Virtual Studio window, go to the Mock tab and select the MockupDepthScene prefab from the Mock Scene dropdown. If you can’t find your prefab in the dropdown, click the refresh icon to the right of the dropdown and look for your prefab again.
ARDK Mock Mode will now automatically create an instance of your prefab when you are running Unity in play mode in the Unity editor.
Run in Unity and you should see a cube.
Use ToggleDebugVisualisation to verify the depth buffer.
At this point, if all you want to to is see depth then you can call
ToggleDebugVisualisationon the depth manager. This will display the depth buffer.However, if you want to get the buffer as a texture to use for other purposes, instead of just displaying it, you will need to call the
CreateOrUpdatefunctions. We’ll do this in the next steps.Example showing just calling ToggleDebugVisualization and output:
public class DepthTutorial : MonoBehaviour
{
    public ARDepthManager _depthManager;

    void Start()
    {
        _depthManager.ToggleDebugVisualization(true);
    }
}

Get the buffer and convert it to a texture.
We can use
CreateOrUpdateTextureARGB32orCreateOrUpdateTextureRFloatto get a texture from our depth buffer. This returns the raw buffer in a texture so it is not aligned or cropped.To sample or display this texture you will need to use the
SamplerTransformin a shader to align it to the screen by multiplying the transform by the UV coords in a vertex shader.Update the
OnDepthBufferUpdatedmethod in the DepthTutorial script to callCreateOrUpdateTextureRFloatTexture2D _depthTexture private void OnDepthBufferUpdated(ContextAwarenessArgs<IDepthBuffer> args) { IDepthBuffer depthBuffer = args.Sender.AwarenessBuffer; //we have a choice of ARGB or RFloat for the texture depending on what your device supports. depthBuffer.CreateOrUpdateTextureRFloat( ref _depthTexture ); }
If you would prefer to use
CreateOrUpdateTextureARGB32instead ofCreateOrUpdateTextureRFloatyou need to normalize the buffer when using it. The following example shows how to useCreateOrUpdateTextureARGB32, but should NOT be added to your DepthTutorial script:// argb example for ref float maxDisp = depthBuffer.NearDistance; float minDisp = depthBuffer.FarDistance; depthBuffer.CreateOrUpdateTextureARGB32( ref _depthTexture, FilterMode.Point, //normalize the texture between near and far plane depth => (depth - minDisp) / (maxDisp - minDisp) );
Set up OnRenderImage to pass our buffer and transform to the shader.
Add an
OnRenderImagefunction to our DepthTutorial script in order to blit to the screen with our shader.Add a material variable to pass in our shader.
Pass the depth texture and transform to the material, and then blit it.
For example:
public Material _shaderMaterial;

void OnRenderImage(RenderTexture source, RenderTexture destination)
{
	//pass in our texture
	//Our Depth Buffer
	_shaderMaterial.SetTexture("_DepthTex", _depthTexture);

	//pass in our transform
	_shaderMaterial.SetMatrix("_depthTransform", _depthManager.DepthBufferProcessor.SamplerTransform);

	//blit everything with our shader
	Graphics.Blit(source, destination, _shaderMaterial);
}
Create a depth material and depth shader.
In the project view, right-click Create > Material. Name the material
DepthMat.Right-click Create > Shader (pick any type, Standard Surface Shader is fine as we will be replacing all the code in it). Name the shader
DepthSh.Point our Material at our shader.
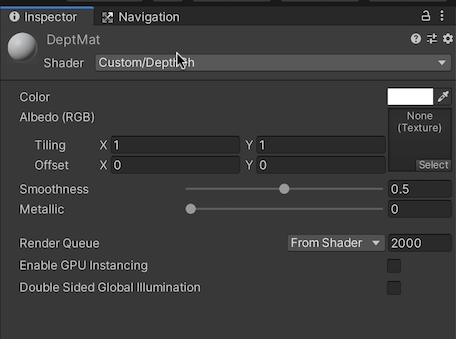
Set the Shader Material field in your
DepthTutorialscript to your new material in Unity.
Update the shader to take a Texture and Transform.
The shader will take in
_DepthTexand_depthTransform. In the vertex shader we will multiply our UVs by thedepthTransformand store them for use in the Frag shader. Then in the Frag shader we will use the transformed UVs when looking up a point in the depth texture.Shader "Custom/DepthSh" { Properties { _MainTex ("Texture", 2D) = "white" {} _DepthTex("_DepthTex", 2D) = "red" {} } SubShader { // No culling or depth Cull Off ZWrite Off ZTest Always Pass { CGPROGRAM #pragma vertex vert #pragma fragment frag #include "UnityCG.cginc" struct appdata { float4 vertex : POSITION; float2 uv : TEXCOORD0; }; struct v2f { float2 uv : TEXCOORD0; float4 vertex : SV_POSITION; //storage for our transformed depth uv float3 depth_uv : TEXCOORD1; }; // Transforms used to sample the context awareness textures float4x4 _depthTransform; v2f vert (appdata v) { v2f o; o.vertex = UnityObjectToClipPos(v.vertex); o.uv = v.uv; //multiply the uv's by the depth transform to roate them correctly. o.depth_uv = mul(_depthTransform, float4(v.uv, 1.0f, 1.0f)).xyz; return o; } //our texture samplers sampler2D _DepthTex; fixed4 frag (v2f i) : SV_Target { //our depth texture, we need to normalise the uv coords before using. float2 depthUV = float2(i.depth_uv.x / i.depth_uv.z, i.depth_uv.y / i.depth_uv.z); //read the depth texture pixel float depthCol = tex2D(_DepthTex, depthUV).r; return depthCol; } ENDCG } } }
Run in Unity.
You should see a correctly aligned gray texture.

Run on your device.
Verify things are working and that you’re seeing the depth texture.

Other things to try:
You can experiment with making effects with the depth buffer (although we will cover some of this in a later tutorial). Some simple effects are:
Depth based blurring/DOF effects
As things get further away they appear blurred and more out of focus.
To do this you can create a post FX shader and pass in the depth buffer.
Create a simple box blur loop, and pass in the depth from the texture as the blur amount.
Scanning effect
Drawing lines in the scene that make it look like a sonar ping.
In the shader you can simply use a time variable that loops 0 to 1 and mix in your scanning color based on the depth value. For example, if the depth = time then make that green
This will create circles that pulse out from the camera.
Completed Source
DepthTutorial.cs
using System.Collections; using System.Collections.Generic; using UnityEngine; using UnityEngine.UI; using Niantic.ARDK.AR.ARSessionEventArgs; using Niantic.ARDK.AR; using Niantic.ARDK.AR.Awareness; using Niantic.ARDK.AR.Awareness.Depth; using Niantic.ARDK.AR.Configuration; using Niantic.ARDK.Extensions; public class DepthTutorial : MonoBehaviour { public ARDepthManager _depthManager; public Material _shaderMaterial; Texture2D _depthTexture; // Start is called before the first frame update void Start() { //subscribe to the depth managers update in order to know when there is a new buffer. _depthManager.DepthBufferUpdated += OnDepthBufferUpdated; } //callbacks to know we have a new depth buffer available. private void OnDepthBufferUpdated(ContextAwarenessArgs<IDepthBuffer> args) { IDepthBuffer depthBuffer = args.Sender.AwarenessBuffer; //we have a choice of ARGB or RFloat for the texture depending on what your device supports. depthBuffer.CreateOrUpdateTextureRFloat(ref _depthTexture); } void OnRenderImage(RenderTexture source, RenderTexture destination) { //pass in our texture //Our Depth Buffer _shaderMaterial.SetTexture("_DepthTex", _depthTexture); //pass in our transform _shaderMaterial.SetMatrix("_depthTransform", _depthManager.DepthBufferProcessor.SamplerTransform); //blit everything with our shader Graphics.Blit(source, destination, _shaderMaterial); } }
DepthTutorial Shader
Shader "Custom/DepthSh"
{
  Properties
  {
    _MainTex ("Texture", 2D) = "white" {}
    _DepthTex("_DepthTex", 2D) = "red" {}
  }
  SubShader
  {
    // No culling or depth
    Cull Off ZWrite Off ZTest Always

    Pass
    {
      CGPROGRAM
      #pragma vertex vert
      #pragma fragment frag

      #include "UnityCG.cginc"

      struct appdata
      {
        float4 vertex : POSITION;
        float2 uv : TEXCOORD0;
      };

      struct v2f
      {
        float2 uv : TEXCOORD0;
        float4 vertex : SV_POSITION;
        //storage for our transformed depth uv
        float3 depth_uv : TEXCOORD1;
      };

      // Transforms used to sample the context awareness textures
      float4x4 _depthTransform;

      v2f vert (appdata v)
      {
        v2f o;
        o.vertex = UnityObjectToClipPos(v.vertex);
        o.uv = v.uv;

        //multiply the uv's by the depth transform to roate them correctly.
        o.depth_uv = mul(_depthTransform, float4(v.uv, 1.0f, 1.0f)).xyz;
        return o;
      }

      //our texture samplers
      sampler2D _DepthTex;

      fixed4 frag (v2f i) : SV_Target
      {
        //our depth texture, we need to normalise the uv coords before using.
        float2 depthUV = float2(i.depth_uv.x / i.depth_uv.z, i.depth_uv.y / i.depth_uv.z);
        //read the depth texture pixel
        float depthCol = tex2D(_DepthTex, depthUV).r;

        return depthCol;
      }
      ENDCG
    }
  }
}